I admit, I have been remiss in posting some update photos lately so above are a few more! In the top photo you may notice something a little different. For instance the radiator is a tad larger, six inches larger in fact. You see Ford installed an eighteen inch radiator in 1965, a twenty inch radiator in 1967 and a twenty-four inch radiator in 1968 - all for the same small block V8! Looks very stock and will help with that summer time heat. I also installed a larger A/C condenser - I like to stay cool too! There is still quite a bit of fit and finish work as you can see in the second photo, but it's getting there! Also, check out the interior pieces. The sunlight adds a little more bling, but I think it will be fine when installed on the car. Santa I have been very good this year, may my car come home for Christmas!
This week in the body shop, my painter is reassembling the suspension on the mustang! Already he has painted the engine bay and added the front end. He will then paint the rear leaf springs (original) and clean up on the underside of the car. Next it's on to the interior components. The last photo is of the original C5AE6015-E engine. It needs a little attention, but I think it will be alright with just some detailing. The real fun will be when I get the rolling chassis back and reassemble all the wiring, glass, chrome, lots of sound deadening and then the interior. Looks like a good winter project right?
Well, you can knock me over with a feather! I received a call from my painter that he had a surprise for me - how cool is this? The fenders above are painted an original mustang color for 1965 - Code Y Silver Blue Metallic. The entire outside has been painted and now is in the process of being color sanded, etc. The interior and all the trim pieces still need paint. So maybe this will be a nice Christmas present? More details soon!
Y0FdzcBPuZ84Pbng~~60_12.JPG)
The very first day I purchased my mustang, I drove up on the highway for a road trip. All went well for several miles until I hit a traffic jam. I sat and sat and the temperature gauge climbed and climbed. In short order, I went from sitting in a traffic jam to causing one. Eventually the cars moved forward and I was able to push the mustang over to the shoulder. Amongst all the rants from locals who passed by yelling, get that junk off the road! I sat and wondered, why is my car overheating? Thus out of necessity began my introduction into vintage mustang maintenance. I was fortunate in that when the car cooled down, it quickly started and ran like a top. I floored it and got out of that dangerous interchange. When I got home I did some research and found out that my car had the wrong fan blade. A factory A/C equipped car came with a five blade fan, not a four blade and it had a clutch. Through our local mustang club, I was able to locate the correct fan blade . Once installed, the little mustang ran like a top and stayed cool! Now I was a little cautious, what else was incorrect on my car? This was the beginning of my illness to restore my car back to a stock condition. Not necessarily concours, I didn't know what that was. I just wanted all the aftermarket frills off my car as I tried to make the car a daily driver. Daily driver? Horrors! Mustangs are meant to be seen, not driven. Cocky pop, as I regularly log 8,000 to 10,000 miles per year on the little mustang. In my tedious attempt to return the mustang to some sort of stability and not a trailer queen ( I did learn that term) I found the mana of all parts stores - swap meets! I just needed replacement parts and the local chain auto didn't carry that. I traveled to a local swap meet and as I reached across the table, I quickly got sticker shock. Why does this stock exhaust manifold cost $200? Enter the term NOS. I didn't know what the letters stood for, but they were synonymous with high dollars! Over time I developed an eye to pick out good parts that just needed a little TLC. The exhaust manifold at another table was rusty, but intact. With some blasting and a powder coat (one of the best inventions out there next to steel wool and lacquer thinner) I now had an exhaust manifold that looked NOS, but was pennies in comparison. My cost for the manifold including the powder coat was $30 not $200. A little sweat equity taught me a valuable lesson and I was able to enjoy my mustang even more. As people exclaimed that the car was a money pit, I would smile inside and say not if you know where to look and are willing to get your hands dirty. Mind you NOS may be worth it, just not until I have exhausted all other resources. Besides, one of the other favorite past times I've developed is tinkering in the garage!
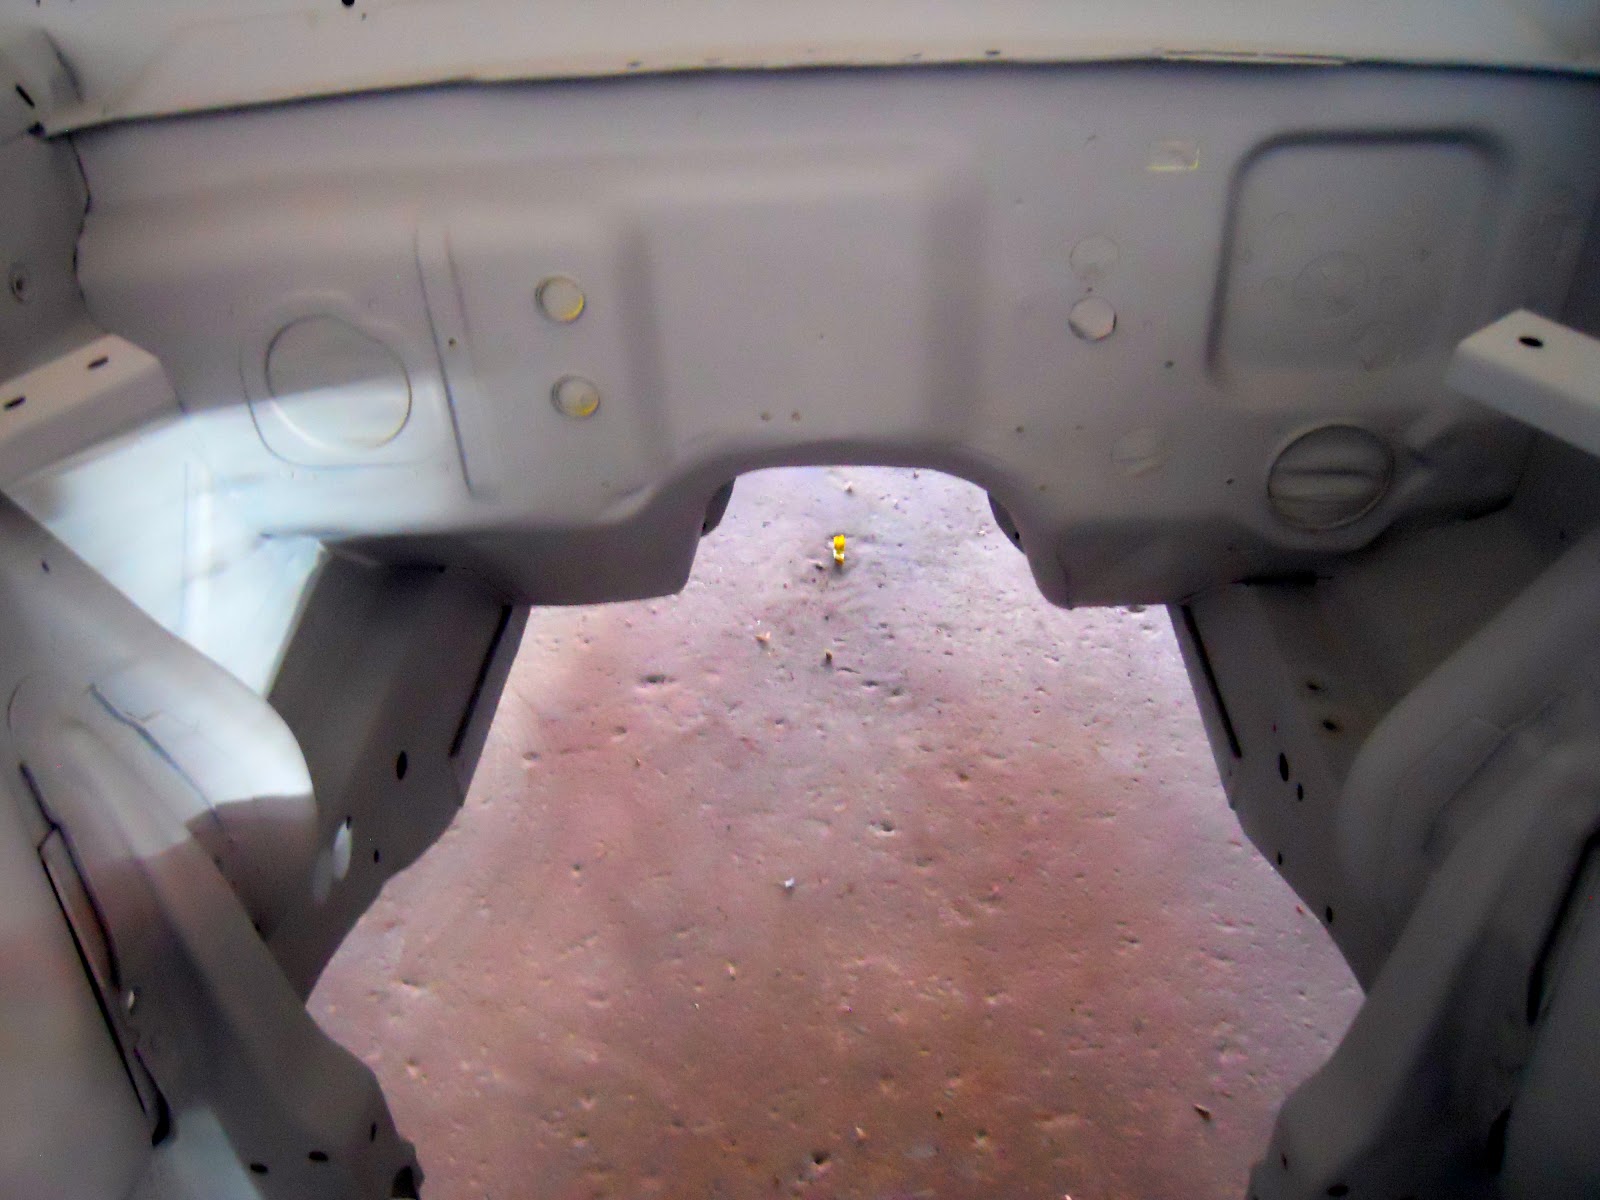
Back when I started my interview process I found several paint and body shops. Although many have excellent references, they were out of my league. So I made an arrangement. If I wasn't in a hurry, I could get my car done in between other projects and stay within budget. This way the shop had a back up for their employees during slow times and I had a fixed fee. So far this arrangement has worked well and the quality is superb. Although this summer is way too hot, the guys are making some progress. In the photos above, all the body work has been completed on the top side. The engine bay is finished and looks great! Work has begun on the underside. All the pans have been seam sealed, epoxy primed and smoothed out. The torque boxes have been trued as the previous owner hopped some curbs. They are working from the front to the back and when complete, will begin to lay the paint!
Quiz: How many fenders to make one good one? In this case two. In the top photo you can see where the rust was cut away from my original date coded fender. Then my painter took a wrecked fender as a donor, butt jointed the two and wahoo - you can see the results above! I was a little worried at first, but my painter said he has seen much worse and this was a fairly simple fix. It is curious to note that the date codes between the drivers and passenger side fenders are three days apart. Maybe FoMoCo took off early for the weekend before stamping the next one? I guess it's not that unusual and I'm glad we didn't go with any aftermarket fenders. There's still a lot of fit and finish, but the mustang is coming along nicely - at least it's looking like a car again!


Y0FdzcBPuZ84Pbng~~60_12.JPG)