Lately with the colder weather and the days getting shorter, I have been able to spend some more time in the garage working on the vent windows. My original chrome was in sad shape with some rust, tarnish and heavy pitting. A good friend turned me on to Turtle Wax. I know it's old school, but it really does work and you can't beat the price! There may be bigger names and more expensive stuff out there, but it doesn't compare. Armed with several bags of 0000 steel wool, many microfiber cloths and Mr. Turtlewax, you can see the results above. Yes, there was a lot of elbow grease, but I think the results are worth it! While I was at it, I replaced all the rubber seals. If you go to a local old fashioned hardware store, you can find the original hollow tail rivets. There is also a punch that has a rounded tip that is used to split and curl the ends. Not only are there rivets to hold the assembly together, but the rear gasket has rivets. Patiently and very slowly drill the old rivets out making sure not to dig into the chrome frame. A small block of metal, hammer, new rivets and the punch is all you need to rebuild the vent window assembly. I am also replacing all of the glass in the car using PS Auto Glass in Wisconsin. The web link is: http://psautoglass.com/ PS Auto Glass has the correct thickness of glass, correct tint for Sun-X and can etch the correct Carlite logo with proper date codes to your car. It really is great stuff! My old glass has deep grinder marks and burn marks from the welder from the previous repairs. Purchasing the kit will make all the glass uniform and clear again! To insert the vent window glass into the stainless frame, purchase some glass tape. It's a thick tar like strip that is about an inch wide. Simply fold the tape over the end of the glass, tightly shape into place folding and cutting pie shape pieces out to go around the curves. The glass tape stays pliable and is easy to work. I used blue painters tape on the just edges to hold the glass tape in place. The frame must be extremely clean (use lots of steel wool) before assembly. I also mixed up some soapy water using dawn dish soap. Use a brush to coat the inside of the frame and the outer edge of the glass tape. Simply press into frame and let dry. If needed, you can tap the glass gently in the frame using a rubber mallet. When the soapy water dries out, the glass tape will stick to the frame. I did confirm that this was how it was done at the factory and the glass tape is wide enough to go around the vent handle. Simply trim off the excess and it's as good as new! I am in the process of doing the door glass now. On the fastback, you have to install the stainless trim piece first as it is used to set the glass properly into the frame below. More details to follow!
Saturday, December 24, 2011
Meet My Friend, Mr. Turtlewax
Lately with the colder weather and the days getting shorter, I have been able to spend some more time in the garage working on the vent windows. My original chrome was in sad shape with some rust, tarnish and heavy pitting. A good friend turned me on to Turtle Wax. I know it's old school, but it really does work and you can't beat the price! There may be bigger names and more expensive stuff out there, but it doesn't compare. Armed with several bags of 0000 steel wool, many microfiber cloths and Mr. Turtlewax, you can see the results above. Yes, there was a lot of elbow grease, but I think the results are worth it! While I was at it, I replaced all the rubber seals. If you go to a local old fashioned hardware store, you can find the original hollow tail rivets. There is also a punch that has a rounded tip that is used to split and curl the ends. Not only are there rivets to hold the assembly together, but the rear gasket has rivets. Patiently and very slowly drill the old rivets out making sure not to dig into the chrome frame. A small block of metal, hammer, new rivets and the punch is all you need to rebuild the vent window assembly. I am also replacing all of the glass in the car using PS Auto Glass in Wisconsin. The web link is: http://psautoglass.com/ PS Auto Glass has the correct thickness of glass, correct tint for Sun-X and can etch the correct Carlite logo with proper date codes to your car. It really is great stuff! My old glass has deep grinder marks and burn marks from the welder from the previous repairs. Purchasing the kit will make all the glass uniform and clear again! To insert the vent window glass into the stainless frame, purchase some glass tape. It's a thick tar like strip that is about an inch wide. Simply fold the tape over the end of the glass, tightly shape into place folding and cutting pie shape pieces out to go around the curves. The glass tape stays pliable and is easy to work. I used blue painters tape on the just edges to hold the glass tape in place. The frame must be extremely clean (use lots of steel wool) before assembly. I also mixed up some soapy water using dawn dish soap. Use a brush to coat the inside of the frame and the outer edge of the glass tape. Simply press into frame and let dry. If needed, you can tap the glass gently in the frame using a rubber mallet. When the soapy water dries out, the glass tape will stick to the frame. I did confirm that this was how it was done at the factory and the glass tape is wide enough to go around the vent handle. Simply trim off the excess and it's as good as new! I am in the process of doing the door glass now. On the fastback, you have to install the stainless trim piece first as it is used to set the glass properly into the frame below. More details to follow!
Wednesday, November 9, 2011
A Firm Foundation
Check out the new full floor pan that runs from rocker panel to rocker panel and front to rear! This mustang is SOLID! Now it's time to smooth out the welds and prepare for paint!
Tuesday, November 1, 2011
Introducing the Mustang Pedal Car!
Well, there used to be floor pans in there somewhere! Seriously, this is just the next step in the restoration. The leak I mentioned previously did a number over the years and rusted out a considerable amount of the pans. We could have cut and welded each side individually, but it would have left too many welds all over the place. Better to replace the entire floor with a new one that has the integrated tunnel. It's stronger, less labor and will have a much cleaner appearance. In the photos above, you can just make out some of the reinforcing bars and jig keeping the car square and true. Next week, we will start the reassembly, I promise!
Friday, October 21, 2011
Everyone Loves a Swap Meet (What's Wrong with this Picture?)
For years I have been collecting parts in preparation for when I would restore the mustang. Sometimes I was able to get just the part I needed, other times I had to take a few other items along the way (bulk sale only). Once my lovely bride opened a closet door under the stairs only to find it full of car parts, she has been very patient with me and hasn't gone near the closet since. Part of the issue has been finding space to lay everything out and inventory what will and what will not go back on the car. Thankfully the body shop has plenty of room to help me do that. What's wrong with the photo above? Nothing really, just proof that I am finally selling some parts! A big THANK-YOU to Don who let me use some table space at the swap meet.
Wednesday, October 19, 2011
Fixing A Hole Where The Rain Gets In...
The frame has been pulled back in line about a quarter of an inch on the front passenger side. This allowed the apron to mate to the cowl and now the front radiator core support has been set and welded into place. Take a close look at the photos above as a larger 1969 radiator has been stabbed and boy, does it look stock! Just what the doctor ordered for a driver that likes to run the A/C in the 100 plus degree heat! All the welds you see are to plug the many holes that were added over the years for miscellaneous junk screwed into the metal from the previous owner(s). The photo above does not do it justice, but the top of the fender apron is now straight and shaped correctly. The eighty percent perspiration in the body work will make the twenty percent effort in the paint look extraordinary!
Thursday, October 6, 2011
Straighten Up and Fly Right...
Measure, measure, measure and then measure some more! This week my welder has moved the car over to an adjacent building where he is building a jig to verify the frame dimensions. He is very meticulous in the details of this car! A little tweak here and there to the frame will make all the difference in the world when it comes time to hang the fenders and align the hood. Note the front core support has been tacked into place temporarily while he is checking the specs. Please disregard the driver's side fender, it was used for the photo op only and will be discarded as it has a bad headlight bucket.
Thursday, September 29, 2011
The Beauty is in the Details
Several years ago while diagnosing another issue, I came across several wires leading to the rear of the car. After further investigation, I learned these wires were part of a harness for back up or reverse lights! Unfortunately when the car was put back together decades earlier, someone left them out and used the wrong valance. Well, I am happy to report that the reverse lights are coming back! Also, note the driver's side tail light that will be adjusted by about a quarter of an inch. The painter and welder are nick picky on the details and I love it! This car has never looked better!
Wednesday, September 21, 2011
Even Godzilla Was Once Just a Little Lizard...
How many spot welds does it take to hold a fastback together? A lot! The right rear quarter panel is now secure as well as the passenger side rocker panel and the door has been hung! Thank you Craig for all your help, this car has never been straighter. Now it's time to clean up the spot welds and move on to the floor pans.
Wednesday, September 7, 2011
Who's afraid of the quarter panel now, Virginia Woolf?
Last week I received several emails and phone calls concerning the lack of a right rear quarter panel on the Mustang. I am extremely happy to report that Shane the welder has been working overtime to get this mocked up and installed properly. Who knew that there are over nineteen key points that have to be aligned properly in order for the trunk, floorpans, rear glass, doors, etc to work and Shane nailed it! Yabba Dabba Doo! More photos soon, but my painter has informed me I can't spend the night in the shop and have to go home!
Monday, September 5, 2011
Thank Goodness For Assembly Manuals!
Okay, I admit it, I have been a little lax on some of my sideline projects with all this 100 + degree heat! Although I may not remember where every little nut, bolt or screw goes, I have a complete set of assembly manuals with exploded diagrams to help along. Trust me, these manuals are invaluable!
Classic Mustang Dreaming on Such a Summer's Day!
This time of year is really hard for me. As the weather turns cooler (Thank goodness!), I long to be driving my old mustang. But for now I will leave you with a photo from last year's race at Eagle's Canyon in Slidell.
Monday, August 29, 2011
Saturday, August 27, 2011
Holy Smokes! Where's The Car?
Making great progress on the right rear quarter panel, more details soon! Note Annie the guard dog in the last photo as she keeps an eye on the Fastback! Viewings by appointment only and be sure to bring a few dog treats!
Sunday, August 21, 2011
Preparing For The Really Big Shew.. (Ed Sullivan)
This week's work involves removing the lead seams in preparation for replacing the right rear quarter panel with original FoMoCo sheet metal from a donor car. More details soon!
Saturday, August 13, 2011
Ssnake Oyl
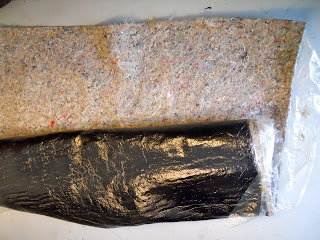
I saw my friend Craig today and he brought me some goodies, thank you Craig! Snake-Oyl is a fabulous company that restores seat belts and provided the under carpet insulation pictured above. Their work is superb and the concourse level details are unbeatable! The top photo is the under-carpet insulation (jute) that is just like the original factory. I bought a full sheet, but it also comes pre-cut. I will probably go a little overboard, but want to add insulation in the floorpans as much as possible to eliminate road noise. Snake-Oyl also restored the seat belts pictured below and they look fantastic! Check them out at http://ssnake-oyl.com/
Thursday, August 11, 2011
The Driver's Side Door Never Looked So Good!
Shane the welder continues to make great progress! Although there's more work to finish this up, hopefully the driver's side will be completed by this weekend.
Monday, August 8, 2011
Beep-Beep!
The Horn Works! The Horn Works! Okay, I probably could have replaced my horns with some aftermarket ones, but these are original to the car. I tried for the longest time to get one side to work, but nothing happened. Recently I read an article where Gary at the Horn Works totally disassembles and rebuilds the horns using factory correct rivets. The best part is not only do they work, but they are even louder and now in tune! No more squawking! Check out www.classiccarhorns.com
Shane is in the House!
Went by the body shop today and Shane the welder is making great progress! He has already fixed the A-arm support and has the rocker panel back in place! Oh yeah!
Friday, August 5, 2011
Progress Pics!!!
The photos above may not be very clear, but you can make out where the leading edges of the fender apron have been repaired. Previously this was missing and now there is some meat to weld the radiator support back into place.
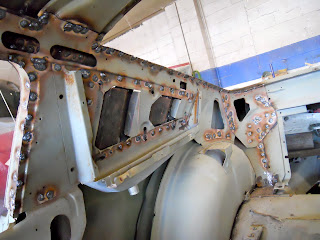
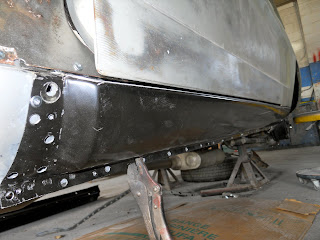
No termites haven't started chewing on the car, we have removed the A-frame and rocker panel on the driver's side. They were smashed in and now we are hammering them back into shape. No wonder the door was always binding and wouldn't align properly... This weekend I will go in and clean up the car (more caked on baking soda from when we stripped the car) and prime the inside of the rocker panel before it's re-welded (appears it was never primed or painted on the inside from the factory as I found stenciled date codes on bare metal).
Subscribe to:
Posts (Atom)


