Thursday, May 24, 2012
Odds and Ends...
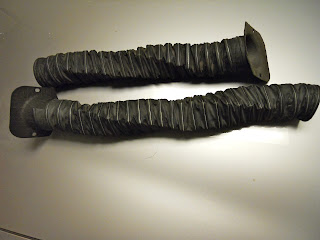
This week I have been working on some odds and ends. In the top photos you will see my original heater vent tubes. The tubes were sliced open along the wire ribs and there were a few puncture holes too. I stretched the pieces close together, placed blue painters tape along the outside to hold it in place and then put a glob of black silicon on a stir stick and patched it from the inside. When the silicon was dry, I removed the painters tape and you will be hard pressed to tell where the duct was torn! The 1965 wiring diagram book is one of my latest finds at a recent swap meet. It has all ford production cars in 1965 and has been out of print since that time. I know there are other reproductions manuals out there, but I like how clear and large the print is on the diagrams and the cost was a mere twenty dollars! This will come in handy later on. The last photo is the underside of a radio speaker grille I picked up from my friend Paul. Thank you Paul! If you look close, you can pick out the new rubber bushings I found at the local hardware store. I am having a lot of fun working out all the details and restoring these original pieces in preparation for the assembly!
Saturday, May 12, 2012
Adding A Little Bling Or Measure Once, Measure Twice...
Today was a surprisingly cool day and a great opportunity to work out some details on the mustang. The top photo shows some tools I used and the most helpful was the spring loaded punch. Simply press on the handle and it punches a nice neat dint in the metal to keep the drill bit from walking. I started out transferring my measurements for the MUSTANG letters to the repaired area on the lower part of the fender. Thankfully a friend turned me on to Southwest Classic Mustangs who had a template or I would have been working on that for quite while. Next I set the door mirrors and something new for me was a convex passenger side mirror. Very nice! One particular point of interest is the photo at the dash which shows an original hole for the fog light switch. Notice the flat spot to one side which indicates a factory installation not an add on. Since my passenger door was twisted and beyond repair, I found an original replacement, then transferred the hole for the door courtesy lights. All these details will help make it easier to paint later.
Subscribe to:
Posts (Atom)


