Thursday, May 24, 2012
Odds and Ends...
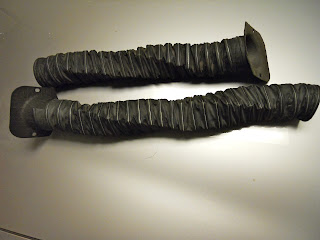
This week I have been working on some odds and ends. In the top photos you will see my original heater vent tubes. The tubes were sliced open along the wire ribs and there were a few puncture holes too. I stretched the pieces close together, placed blue painters tape along the outside to hold it in place and then put a glob of black silicon on a stir stick and patched it from the inside. When the silicon was dry, I removed the painters tape and you will be hard pressed to tell where the duct was torn! The 1965 wiring diagram book is one of my latest finds at a recent swap meet. It has all ford production cars in 1965 and has been out of print since that time. I know there are other reproductions manuals out there, but I like how clear and large the print is on the diagrams and the cost was a mere twenty dollars! This will come in handy later on. The last photo is the underside of a radio speaker grille I picked up from my friend Paul. Thank you Paul! If you look close, you can pick out the new rubber bushings I found at the local hardware store. I am having a lot of fun working out all the details and restoring these original pieces in preparation for the assembly!
Saturday, May 12, 2012
Adding A Little Bling Or Measure Once, Measure Twice...
Today was a surprisingly cool day and a great opportunity to work out some details on the mustang. The top photo shows some tools I used and the most helpful was the spring loaded punch. Simply press on the handle and it punches a nice neat dint in the metal to keep the drill bit from walking. I started out transferring my measurements for the MUSTANG letters to the repaired area on the lower part of the fender. Thankfully a friend turned me on to Southwest Classic Mustangs who had a template or I would have been working on that for quite while. Next I set the door mirrors and something new for me was a convex passenger side mirror. Very nice! One particular point of interest is the photo at the dash which shows an original hole for the fog light switch. Notice the flat spot to one side which indicates a factory installation not an add on. Since my passenger door was twisted and beyond repair, I found an original replacement, then transferred the hole for the door courtesy lights. All these details will help make it easier to paint later.
Wednesday, April 25, 2012
One Side At A Time...
Quiz: How many fenders to make one good one? In this case two. In the top photo you can see where the rust was cut away from my original date coded fender. Then my painter took a wrecked fender as a donor, butt jointed the two and wahoo - you can see the results above! I was a little worried at first, but my painter said he has seen much worse and this was a fairly simple fix. It is curious to note that the date codes between the drivers and passenger side fenders are three days apart. Maybe FoMoCo took off early for the weekend before stamping the next one? I guess it's not that unusual and I'm glad we didn't go with any aftermarket fenders. There's still a lot of fit and finish, but the mustang is coming along nicely - at least it's looking like a car again!
Saturday, April 7, 2012
Happy Anniversary Mustang!
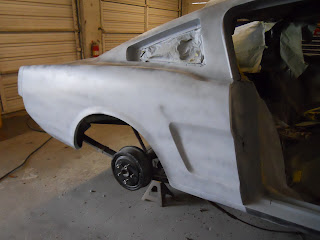
Well just over a year ago with the help of some of my good friends, we stripped the Mustang down to a rolling shell with engine and wheels. In that year there have been a lot changes. It may be slow going, but the work is solid. Above are a few update photos as the body shop moves into the engine bay. In the past year the body shop has replaced the right rear quarter, full length floor pan, toe boards, both rocker panels, drivers side A pillar, radiator core support and has begun the epoxy primer coat. All pieces were replaced with original sheet metal where I could. More to come!
Thursday, March 22, 2012
Prime, Sand, Repeat... Part Deux
I have been remiss in posting photos of late, so enclosed are few updates. The car is coming along nicely and I really like how the epoxy primer has been laid down, very smooth and very close to the metal. as you can see in the photos above, they have worked out the rear quarter panels, are almost complete with the roof and working their way to the front engine bay. Although it may not show in the photo above, there is a small dip in the roof about the size of a dime. Things like this drive my painter nuts and he works it till it's perfectly smooth. I certainly appreciate his eye to details as I know I would never have the patience, but know the more he works on it, the better it gets!
Saturday, March 10, 2012
Steel Wool On Steroids!
Today it's cold and rainy outside and I'm safe working in the garage. I'm cleaning the trim that goes around the windshield and rear glass on my fastback. It has dried tar that's forty years old, silicone (not from me) and paint overspray. I was able to scrap the big pieces of tar off using a plastic putty knife which thankfully didn't leave any scratches. Then I dipped steel wool in lacquer thinner and got to work. I thought it would be impossible to get all the crud off, but had a set cleaned in about half an hour using a lot elbow grease. Yahoo, I had no idea that it would be this easy! Now if I can figure out a way to pop out some of the dents and straighten some of the trim, it'll be ready to go back on the car!
Monday, March 5, 2012
Prime, Sand, Repeat...
This week in the body shop, they are blocking the car! No bondo here just an epoxy primer that can be sanded. They are mocking up the rear quarter extension panel along with the tail lights and deck lid. I don't think the car was this straight from the factory. There's still a little tweaking here and there, but I think the results are fantastic! More details soon.
Subscribe to:
Posts (Atom)


